Table of Contents
Level Editor
The HPL Level Editor is our own application to build maps for HPL3-based games. It is comprised of a set of basic object creation and edition modes which make the building task a lot easier.
Overview
When run, the first screen we get to see is like this:
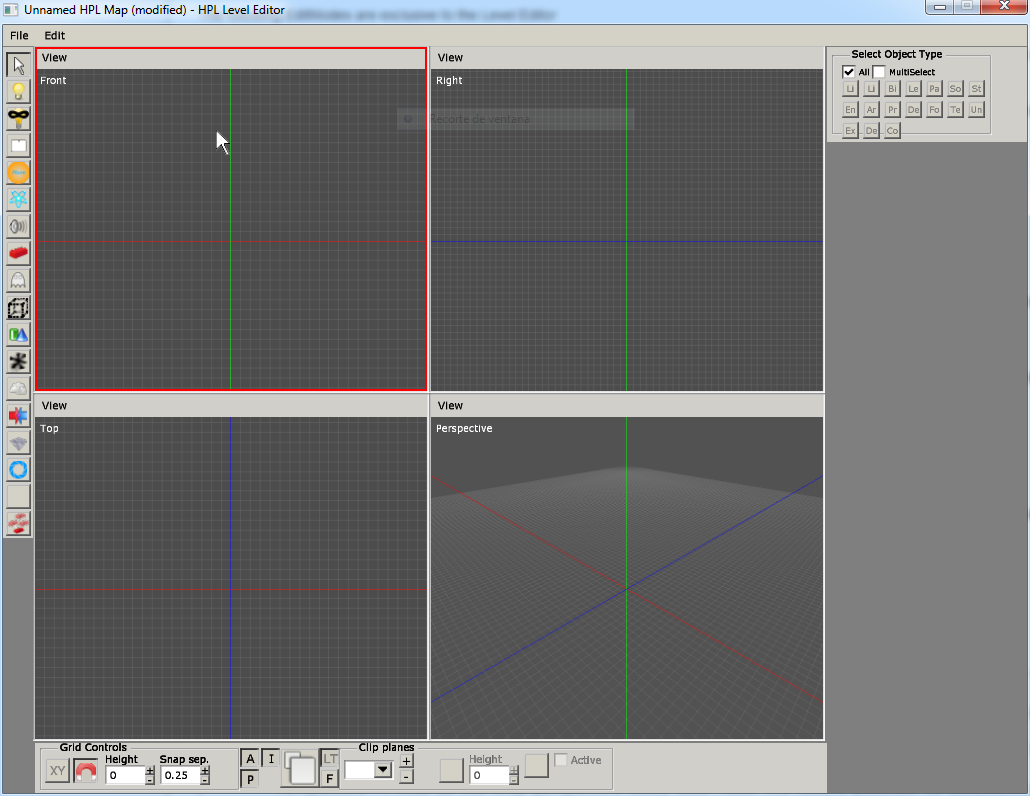
Each part of the screen has a specific function, as follows:
- Main menu bar: this is where every non-editor command lies, as well as some edition ones.
- EditMode sidebar: here you will find a set of buttons used to switch the current behaviour of the editor. More on this later.
- EditMode window area: any helper input the current EditMode needs will appear here.
- Viewport area: this area of the screen is reserved for the viewports, which are used to actually see what you are doing to the map. Every viewport has its own menu bar, to control some parameters of the visualization.
- Lower toolbar: some tools that are either viewport-dependent or global are located here.
Not listed above are some special windows, used pretty often here:
Main Menu
This is a menu bar, just like in any other windowed application. Available options for this particular editor are as follows:
- File
- New: This command will reset the map to an empty one, and the editor to a default state as well.
- Open: This will open the Load file dialog for opening a saved map file.
- Save: Use this to save your work to a file in disk. Will ask for a file name on the first time saving.
- Save As: This will also save your work, but will ask for a file name everytime it is called.
- Open Recent: This will show a list of up to 10 files that have been recently loaded or saved.
- Import Objects: This will show a file dialog with exported object (.expobj) files. When picked, the objects in the file will be added to the map.
- Export Objects: This will save the current selection to a .expobj file.
- Quit: This will exit the program.
- Edit
- Undo: Use this to undo the last action. Note that not everything you can do in the editor is undo-able.
- Redo: Use this to redo the last undone action.
- Duplicate: This will clone the current selected objects. More details on selection later.
- Delete: This will delete the current selected objects.
- Search for object: This will open the Find objects window. It is useful when you want to find a particular object and don't want to actually look for it.
- Browse groups: This will open the Group window. This one is used to manage groups of objects.
- Level Settings: This will open the Level Settings window. This is used to add global fog and skybox to a level, also has other tools.
- Level Info: This will open the Level Information window. This window shows interesting data such as projected memory usage.
- Preferences: This will open the Preferences window. You will find general settings for the editor here.
EditMode selection bar
Here you will be able to switch between the different EditModes available in this editor. An EditMode describes the state the editor is going to work in when selected. These five EditModes can be found in both this and the Model Editor.
- Select EditMode: this mode is used to select and edit objects.
- Light EditMode: with this mode you will be able to place lights around.
- Billboard EditMode: use this to create Billboards. Light halos, light shafts, and some other
- Particle System EditMode: one can add Particle systems to the map with this mode.
- Sound EditMode: used to place sound entities in the map.
- LensFlare EditMode: used to create objects that will generate a lensflare effect when looked at.
The following EditModes are exclusive to the Level Editor
- StaticObject EditMode: this, and the Primitive EditMode, are the actual building tools. StaticObjects (aka level pieces) are placed using this.
- Entity EditMode: objects that are interactive, such as doors, boxes and NPCs are created here.
- Area EditMode: Areas are places that can be used for several ends, like linking to scripts, setting up where the player starts the map, and so on.
- Primitive EditMode: creates static geometry to be part of the map. Only Planes are currently supported.
- Decal EditMode: give detail to objects by placing decals on them.
- FogArea EditMode: similar to the Area EditMode, but will place volumes containing a fog effect.
- Combine EditMode: useful for optimizing, creates groups of static geometry that will be loaded by the engine as a whole.
- LightMask EditMode: creates objects that will keep light from illuminating the space outside them.
- ExposureArea EditMode: creates areas that will modify the camera exposure values when inside them.
- Combo EditMode: used to place combo objects (compound objects saved as combos)
- Terrain EditMode: used to create and set up a terrain.
- DetailMeshEntity EditMode: places mesh objects that can be drawn really fast, thus can be used for adding detail to the scene.
Viewport area
This area is meant to actually show what the map contains. There are four viewports in this editor, and their initial setup is shown in this picture:
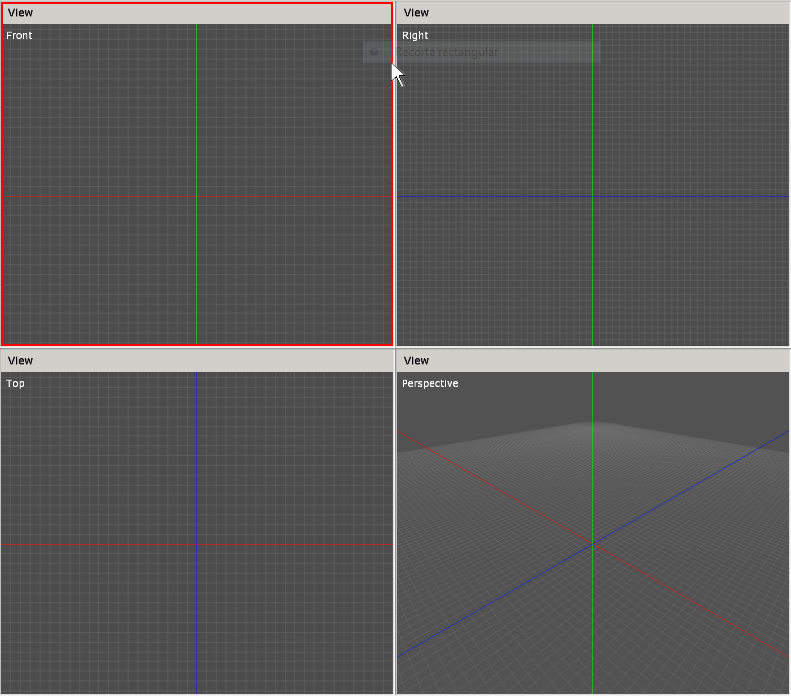
Viewport in focus
When working on a map, only one viewport will be focused at a time. This is shown by a red highlight around the currently focused viewport (in the picture above, focus is on the lower right viewport). To set the focus on a viewport, just move the mouse into it.
In the Level Editor, some controls for the currently focused viewport is shown in the Lower Toolbar.
View Menu
Each viewport has a “View” menu bar, which includes the following options:
- Camera Mode: choosing an item from this submenu will reset the viewport to a preset. An ortho preset means that it will use orthographic mode, so no perspective distortion will be seen. All presets reset the camera target to a (0,0,0) position. One out of the following presets can be picked:
- Front: ortho preset, scene will be seen from the front.
- Right: ortho preset, scene will be seen from the right side of the objects, pointing to the left.
- Top: ortho preset, scene will be seen top-bottom.
- Perspective: this is the only perspective mode, will reset the camera position to (10,10,10).
- Render Mode: the mode that will be used by the viewport to draw objects
- Wireframe: only edge lines for polygons will be drawn in this mode.
- Shaded: drawing will be fully done, using lighting just like ingame. Ortho presets cannot use this mode.
- Controllers: under this item you will find the available controllers for the current view. These can either be Maya or Fly. More details later.
- Show Grid: toggles showing of the helper grid.
- Show Axes: toggles showing of the XYZ axes.
Moving and looking around
Depending on the active controller, moving will be done differently, but all are activated using the view mode key (default left Alt). When this key is held, the red focus frame will turn yellow.
Linux Note: Left Super (aka “Windows” or Apple key) and the Z key are also the view key as the Alt key is usually bound by the Window Manager.
Mac OS X Note: A three button mouse is required to use the editor.
Maya
All movement and looking will be done using the mouse. In a nutshell, there are three basic movements that can be done:
- Tumble: pressing the 'view' key and the left mouse button at the same time will activate the Tumble mode. This means the camera target will stay in place while the camera will orbit around it.
- Track: pressing the 'view' key and the middle mouse button at the same time will activate the Track mode. According to the track mode that is set, this will behave in two different ways:
- Tracking lock to grid is disabled: the camera target will move along the current screen plane, meaning it will move left-right or up-down along with the mouse. The camera position will stay the same with respect to the target.
- Tracking lock to grid is enabled: this allows the user to click on the grid, hold and drag to get a camera displacement. Pretty useful when one wants to cover large distances. This mode is forced in ortho views.
- Zoom: pressing the 'view' key and the right mouse button at the same time will activate the Zoom mode. Moving the mouse forward/backward will then zoom in/out respectively. Note there are limits for zooming in and out. You can also zoom in/out by rolling the mouse wheel up/down.
Fly
Looking around is done with the mouse, moving is done with standard FPS controls: W key moves forward, S key moves backward, A and D goes left and right respectively. Q and E for moving up and down.
Enlarging a viewport
When working in a viewport, the common thing to do is enlarging it. This can be done by clicking on the 'enlarge button' in the lower toolbar, or pressing the shortcut for it (spacebar).
Lower Toolbar
You can find some useful controls in this bar located at all times at the lower part of the screen.

- Grid Controls:
- Grid Plane: cycles through the available grid planes (XZ, XY, YZ).
- Toggle Snap (magnet button): enables/disables snapping for translation (over grid), rotation and scale.
- Grid Height: height of the plane, measured on the plane normal.
- Snap Separation: separation of snapping points.
- Enlarge Viewport button: will toggle enlargement of the focused viewport.
- Misc controls:
- A: toggles global ambient lighting
- P: togles global point light
- LT: toggles Lock to grid for tracking in focused viewport
- F: focus on currently selected object(s)
- I: toggles displaying of icons.
- Clip Plane controls
- Selected clip plane: used to select a clip plane among the available ones.
- Add /Remove clip plane (+/- buttons): adds a new clip plane / removes the selected one.
- Actual Plane: cycles through the available planes (XZ, XY, YZ).
- Plane height: height of the plane, measured on the plane normal.
- Pos /Neg Button: sets the culling side of the plane.
- Active: sets whether the plane should cull objects.
Types of Objects
These are the kinds of objects that you can create and place in this editor. Details on each one and parameter listing in the following links:
The following types are exclusive to the Level Editor