Sidebar
Table of Contents
[Add-on] Blender to HPL3
https://github.com/cadehaley/BlenderHPL3export
To Download: (GitHub → “Clone or Download” → “Download ZIP”)
HPL3 Exporter Version 1.2
This addon allows you to model anything from single assets
to entire maps within Blender, and synchronize them to an HPL3 engine map,
automatically creating and configuring textures, material, and entity files
for a fast iteration process. The script is also capable of removing objects
from the HPL3 map which have been removed in the Blender scene, and baking
lighting onto scene objects.
INSTALLATION (Requires Blender 2.80 Beta or later)
1. Copy “io_export_hpl3.py” and the “nvidia” folder to Blender's addons
directory (“…/Blender/2.80/scripts/addons”)
2. Open Blender, go to Edit > Preferences > Add-ons > Search “hpl3”
3. Check box next to “Import-Export: HPL3 Export” and press “Save Preferences”
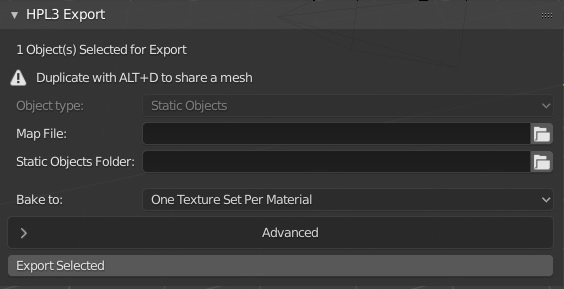
4. Exit window and go to the Tools bar in the left side of the 3D View. Drag
the width of the Tools bar out to set fields, and press T to hide the tools
bar at any time. Have fun!
Important usage notes
– Give each object a unique name in the asset's “Object Data” panel
(under the poly triangle icon, not to be confused with the “Object” panel
under the cube icon).
Example: Object name = “evil_suzanne_by_doorway.005”
Mesh Datablock name = “Suzanne”
On export, the subdirectory and mesh file will take this name (“Suzanne.dae”),
and having name conflicts in HPL3 can cause the wrong textures to load.
The “Object Name” does not matter as much, and will be used to name that
instance of the object when placed in the map.
– If texture is black or has black parts, make sure UV faces are
within the square UV boundary. Texture baking requires that each material use
a single “Principled BSDF” node and that all UV faces lie within UV
coordinate bounds.
– When baking multi-material, think of each material as having
its own UV set. Faces assigned to Material A cannot overlap in the UV editor
with other Material A faces, though it is ok (even recommended) for faces
assigned to Material B to use up the full UV space, since it won't matter
if a face from Material A overlaps with a face from Material B. Just make
sure your mesh only uses one UV map. Check this by going to
[Object Data (Poly Triangle Icon) > UV Maps], located under Vertex Groups
and Shape Keys.
– Use Alt+D to create copies of an object in Blender to place
around a map, since they will point to the same “Mesh” datablock. Using
Copy/Paste or Shift+D creates a new “Mesh” datablock every time, and therefore
a new .dae and .dds file on export, leaving you with multiple repeat numbered
.dae and/or .dds files taking unnecessary space on export.
– In the Level Editor, if objects fail to appear after pressing
the button to reload static object or entity changes, try exiting out of the
editor and reloading your map to make objects appear properly again.
BUGS
For any questions or to report any bugs, message me @cadely on the Frictional
Games unofficial Discord (https://discord.gg/sXKZ9R2) or on frictionalgames.com/forum

