Sidebar
hpl3:engine:terrain
Table of Contents
Terrain
Geometry
How it works
The terrain works by generating all of the visible geometry in real-time. The only data of the terrain that exists is really the heightmap. What happens is that a patch with a grid is rendered many times, each time rendering a different part of the heightmap. So if the patch size is 32 and the heihtmap is 64×64 then it takes 4 patches to render the terrain.
However, In order to support really large terrain, patches that are far away from the camera cover a larger piece of the heightmap. So for example if the heightmap is 1024×1024 and the patch size is 32, then only the patches nearest the camera will have a 1:1 correspondence with the height map (a 32×32 patch renders 32×32 heightmap pixels). Patches a bit further away (determined by an algorithm) will be covering a 64×64 heightmap, even further away 128×128, and so on.
For a more detailed run-down of the system check here here.
Patch Size
As noted above patch size plays an important role in how how the terrain is divided up. There is no simple rule on what path size to used (unless textures are taken into account, see below). One rule is that the larger the patch the longer distance it will be until a the lower resolution ratios (like a 32×32 patch covering 64×64 pixels) are used. So of the there are very visible popping in the geometry, then it might be worth to increase the patch size. Very often though, patch size should be determined early in a project and all maps should share the same size.
Texturing
How it works
Texturing works by rendering the textures needed on the fly. This includes the blend layers, a color multiplier and decals (and possibly other things in the future). There is a number of cache textures in the engine and the engine renders textures for all visible patches to these. Just like with the geometry, patches nearby get highly detailed, while patches further a way gets less details. How this works is that each cache texture renders a texture that is to cover single, four, eight, etc geometry patches, depending on the texture patch size.
Because all the cache textures are not updated very often, it is possible to cram in a lot of processing in their creation. Because of this, you can have a lot of decals and blend layers than you would have in a system that rendered these directly. There is still cost, and if the data gets too heavy there might be sudden lags when the textures are recalculated, but generally you do not have to worry about having lots of decals and the like.
The size of the largest texture is 2048×2048.
For more detailed information see here.
Patch Size
Patch size controls the patch size of the max resolution cache texture. This is very important as it affects the rendered quality of the terrain texture. The size of the terrain patch size determines how many geometry patches it will cover. Given a 32×32 geometry patch, a 32×32 texture patch will cover a single and 64×64 texture patch will cover 4 geometry patches. Texture patches cannot cover less than a single geometry patch, so there fore terrain patches must be the same or larger as geometry patches.
If you have a height map that is a 64×64 pixels and unit size of 1 meter, that means you have a 64×64 meter large terrain. If the texture patch size is 64 then that means that a single texture will cover the entire terrain, meaning the max number of pixels per meter is 2048 (max cache size) divided by 64, which is 32. This is the same as a 32×32 texture covering a 1×1 meter polygon square. In order to boost this quality, the texture patch size, and most likely the geometry too (remember, texture patch size cannot be lower than that for geometry). If we instead decrease texture patch size to 32, we get 2048/64 = 64 pixels per meter.
This is very important for the visual fidelity and like geoemtry patch size it should be determined at an early stage and be the same for all maps.
Blending
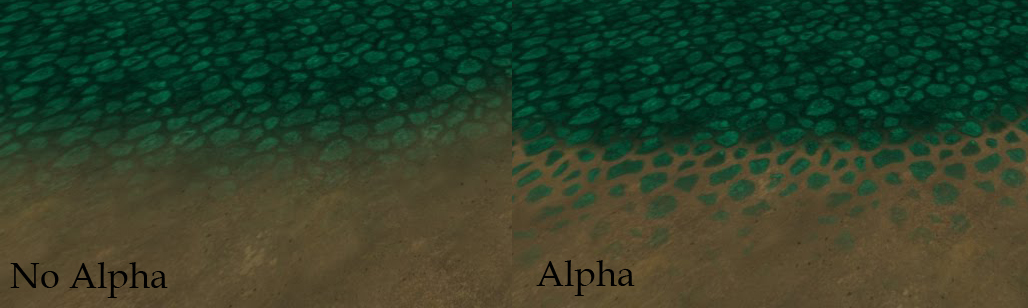
If the diffuse texture of a sublayer in a blendlayer as an alpa channel then this will determine how fast that part fades when blending with the layer below it. This can be used for fading things in chunks, fort instance simulating gravels that decrease in density. Example:
Undergrowth
Important notes:
- The undergrowth base mesh must have a 0 - 1 uvmapping!
hpl3/engine/terrain.1329496239.txt.gz · Last modified: 2012/02/17 16:30 by thomas